
Version 1.0.1
Introduction
The Hub Visual Studio plugin shows your project's NuGet dependencies. You can sort your NuGet dependencies by package, license, or security risk without ever leaving Visual Studio. Optionally, you can navigate to Black Duck Hub and view the report for the selected component.
Installing the Visual Studio plugin
To install the Hub Visual Studio plugin:
- In Visual Studio, navigate to the Visual Studio marketplace.
- Locate and select the Hub extension.
Configuring the Visual Studio plugin
Configure your Hub Visual Studio plugin as follows.
- In Visual Studio, navigate to Tools > Options > Black Duck Hub > Settings. The Options window displays.
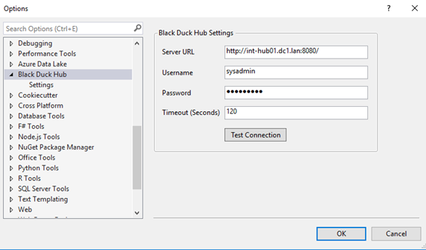
- In the Options window, add your Hub configuration settings:
- Server URL: Type the URL for your Hub server.
- Username: Type your Hub username.
- Password: Type your Hub password.
- Timeout (Optional): Enter the timeout in seconds; the default value is 120.
- Test Connection: Click Test Connection to verify your Hub connection settings.
- If your connection test is successful, click OK.
Using the Visual Studio plugin
You can use the Hub Visual Studio plugin as follows.
- In Visual Studio, navigate to View > Other Windows > Black Duck Hub. Then click Get Packages. You can select your project in the drop-down; the default is All.
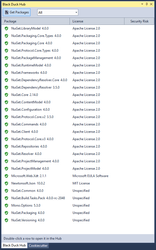
- All NuGet packages display, and you can sort by Package, License, or Security Risk.
- Double-click a package name, and the report for that package opens in the Hub.
Release Notes
Version 1.0.1
- Added support for Black Duck Hub version 4.0.0.
Version 1.0.0
- First release.
