Black Duck Fortify SSC Plugin
Table of Contents
Introduction
The Black Duck Fortify Software Security Center (SSC) plugin runs in the background as a service, and maps your Black Duck project to one or more Fortify SSC projects. It pushes open source security risk information from Black Duck into your connected Fortify SSC application. The implementation also makes it possible to monitor and manage open source risk, and provision the information concurrently into Fortify SSC. This enables you to view and manage all security risks pertaining to an application in a single view.
Downloading
You can download Black Duck Fortify SSC at https://github.com/blackducksoftware/hub-fortify-ssc-integration-service.
Requirements
- Black Duck versions 4.8.0 and higher.
- Fortify versions 17.10.x and higher.
- JDK versions 1.8 and higher.
Fortify Black Duck parser
The Black Duck parser plugin is a simple parser to convert the Black Duck vulnerability report into a Fortify-friendly format.
Downloading and configuring the Black Duck Fortify parser
Download the parser at https://github.com/blackducksoftware/hub-fortify-parser/releases.
Install the Black Duck Parser using the following instructions corresponding with your Fortify environment:
- If you are using SSC 17.20 or later, install and enable the
blackduck-plugin-<Version>.jarparser plugin using the SSC user interface. - If you are using SSC 17.10.x and Fortify is not running under a service account, then copy the
blackduck-plugin-<Version>.jarfile to$USER_HOME\.fortify\plugin-framework\plugins. - If you are using SSC 17.10.x and Fortify is running under a service account, then there is no
$USER_HOME\.fortifydirectory into which to copy the Black Duck plugin. To address this, do the following:- On the local server, create a
C:\.fortify\plugin_framework\pluginsdirectory. The service account must be able to read this folder. - Copy the Black Duck plugin to this directory.
- The Tomcat service configuration application has a Java tab that contains a Java Options text box. Add the following line at the end of the existing list of options:
-Dfortify.home=C:\.fortify - Restart the Tomcat service.
- On the local server, create a
- If you are using SSC 17.20 or later, install and enable the
Using the Black Duck Fortify parser
The plugin is invoked automatically when the Black Duck Fortify SSC integration service uploads the security vulnerabilities using the Fortify Upload API.
Building the Black Duck Fortify parser
If you don't plan to modify the source code, there should be no need to recompile and build the parser; however, if you change the source code, you must rebuild. The parser is a Gradle project; there are dependencies on Fortify jars in the /WEB-INF/lib directory within the Fortify tomcatforSSC folder.
- Open the build.gradle file and find the version of the fortify jars. They are the fortify-public and model jars. These are located in your Fortify installation in the
..\WEB-INF\libfolder. - Install the fortify jars into your local repository.
- Run
gradle clean assemble. - This creates a /build/ folder containing the blackduck-plugin-x.jar file. It also creates a target/libs folder that separates the provided and compiled jars. The compile folder contains a univocity-parsers-x.jar file that must be placed in the Fortify class path.
Upgrading the parser to version 2.0.2
The latest release is 2.0.3.
If you have previously installed a version of the parser lower than 2.0.0, you must upgrade to the latest version.
As of Black Duck Fortify version 2.0.2, additional columns are added to the security vulnerability report to fix the duplicate ID issue, and to display detailed security information in the Fortify UI. This allows the parser to process file formats used prior to Black Duck Fortify version 2.0.7 and Black Duck parser version 2.0.2. This is a one-time process. Before beginning the upgrade of the parser, we recommend saving your report data from within the Fortify UI. This ensures that you can restore your data if you need to revert to the old parser. The steps are as follows.
- In Fortify SSC, navigate to Application Version > Artifacts. Delete all files related to type = BLACKDUCK.
- Place the new Black Duck parser plugin into the appropriate directory on the Fortify SSC server.
- Download the report for the application. This is for your future reference.
- Delete all files uploaded for the application.
- Place the new Black Duck parser plugin into Fortify.
- Add the application to the mapping.json file.
- Execute the batch job to push all vulnerabilities to Fortify.
Installing and starting the Black Duck Fortify SSC plugin
Use the following procedure to install and run the Black Duck Fortify SSC plugin.
- Download the Black Duck Fortify SSC plugin zip file to the destination folder of your choice.
- Unzip the file. The unzipping process automatically creates the folder structure and files in the required location. The folders are:
- Bin: Contains the executable files. The Bin folder also contains the scripts to be executed in UNIX (hub-fortify-integration.sh) and Windows (hub-fortify-integration.bat).
- Config: Contains the configuration files, such as application.properties, attributes.properties and mapping.json.
- Lib: Contains the dependency JAR files and the Black Duck Fortify code base JAR file.
- Log: Contains the log files.
- Report: Contains the .csv files. Should there be a failure, the .csv files contain the relevant information and data pertaining to the last successful upload.
- Configure your settings. Refer to Setup and Configuration for details.
- To start the service, navigate to the Bin folder created by the zip file, then run either:
- The .bat file (for Windows), or:
- The .sh file (for Linux).
Setup and configuration
After you have downloaded and installed the Black Duck Fortify SSC plugin and the Black Duck parser, use the following processes to configure your Black Duck Fortify SSC plugin.
Application.properties file
Configure the application.properties file to integrate Black Duck with your Fortify SSC projects. The application.properties file contains:
- Information about Cron expressions for batch operations.
- The Black Duck URL for your environment.
- Your Black Duck user name and password.
- The Fortify SSC URL for your environment.
- Your Fortify SSC user name and password.
- Your proxy settings, where applicable.
- Whether to perform the batch job status check. For example, if the batch.job.status.check property is set to false, the vulnerabilities are uploaded to Fortify SSC for each batch run. If the batch.job.status.check property is set to true, then the following condition is performed:
If the project BOM updated date is greater than last successful runtime of the job, then only the vulnerabilities upload to Fortify SSC. Otherwise, it is ignored.
# Cron expressions can be generated at http://www.cronmaker.com.  The cron expression must contain six values; ignore the last value.
cron.expressions=0 0 0/1 * * ?

spring.batch.job.enabled=true

# Black Duck Hub Server details - Either hub username and password or API token to be provided. If both given, API token will be prioritized
hub.username=<<HUB_USER_NAME>>
hub.password=<<HUB_PASSWORD>>
hub.timeout=12000
hub.server.url=https://<<HUB_SERVER_IP_ADDRESS>>:<<HUB_SERVER_PORT_NUMBER>>
hub.api.token=<<HUB_API_TOKEN>>
# Trust certificate either true or false
hub.always.trust.cert=false


#BlackDuck proxy details - optional
hub.proxy.host=
hub.proxy.port=
hub.proxy.user=
hub.proxy.password=
hub.proxy.nohost=

# Fortify Server details
fortify.server.url=http://<<FORTIFY_SERVER_IP_ADDRESS>>:<<FORTIFY_SERVER_PORT_NUMBER>>/ssc/
fortify.username=<<FORTIFY_USER_NAME>>
fortify.password=<<FORTIFY_PASSWORD>>

maximum.thread.size=5
hub.fortify.batch.job.status.file.path=../config/batch_job_status.txt
hub.fortify.report.dir=../report/
hub.fortify.mapping.file.path=../config/mapping/json
logging.file=../log/hub-fortify.log
attribute.file=../config/attributes.properties
hub.fortify.push.for.zero.vulnerability=true

batch.job.status.check=true

logging.level.org.springframework=ERROR
logging.level.com.blackducksoftware=INFO

# Logging patter for the console
logging.pattern.console= %d{MM-dd-yyyy HH:mm:ss,SSS} %-5p [%t] %c:%L %M -%m%n

# Logging pattern for file
logging.pattern.file= %d{MM-dd-yyyy HH:mm:ss,SSS} %-5p [%t] %c:%L %M -%m%n
To configure the application.properties file:
- Navigate to the Config folder, and open the application.properties file in a text editor. Edit the following settings:
- hub.username: Type your Hub username.
- hub.password: Type your Hub password.
- hub.api.token: Type your Black Duck API token.
- hub.timeout: Hub system timeout value in seconds. The default value is 12000.
- hub.server.url: Type your Hub server URL.
- fortify.server.url: Type your Fortify server URL.
- fortify.username: Type your Fortify username.
- fortify.password: Type your Fortify password.
- batch.job.status.check: Set it as true or false.
- hub.fortify.push.for.zero.vulnerability=true or false.
- Save and close the application.properties file.
To specify an HTTPS connection:
- Navigate to the Config folder, and open the application.properties file in a text editor. Edit the following settings:
- In the application.properties file, modify the line beginning with hub.server.url by specifying your HTTPS URL.
- Save and close the application.properties file.
You can use environment variables to avoid hard-coding certain configuration values in the applications.properties file. It is recommended that you use environment variables for sensitive information like usernames and passwords.
To use an environment variable to set a particular application property, set the property value to $MY_ENVIRONMENT_VARIABLE_NAME, as shown in the following examples.
# BlackDuck Server details
hub.username=$HUB_USERNAME
hub.password=$HUB_PASSWORD
hub.timeout=$HUB_TIMEOUT
hub.server.url=$HUB_SERVER_URL
# Fortify Server details
fortify.server.url=$FORTIFY_SERVER_URL
fortify.username=$FORTIFY_USERNAME
fortify.password=$FORTIFY_PASSWORD
If you prefer not to use Black Duck user names and passwords at all; either hard coded in the configuration, or with environment variables, you can use a Black Duck API token for authentication. To use an API token:
- Log in to your Black Duck user interface
- Select your Username on the top right corner
- Select Profile > User Access Token
This will generate the token. You can now provide this value in your applications.properties file. For example:
hub.api.token=<my API token>
Note that you can also specify the API token as an environment variable for additional security.
Attributes.properties file

For the attributes.properties file, note the following considerations:
- If the attribute name contains a space, then add the escape sequence back slash (\) as shown in the preceding example.
- If the attribute is the Date datatype, then the value must be in YYYY-MM-DD format. For example, 2017-08-15.
- If the attribute is the List Of Values - Multiple Selection datatype, then the value must be comma-separated values. For example, Value_1, Value_2.
- If the attribute is the Boolean datatype, then the value must be true or false. If it is other than true, it is substituted as false.
- If the attribute is the Integer datatype, then the value must be within the integer range. If it is greater than the integer range, or if invalid values are provided, it throws an exception.
- The attribute values are not substituted for non-custom attributes.
Proxy settings
If your Black Duck environment utilizes proxies, you can configure the proxy settings in the applications.properties file as follows.
- Open the application.properties file in a text editor. The application.properties file is in the Config folder.
- hub.proxy.host: Type your proxy host name.
- hub.proxy.port: Type your proxy port number.
- hub.proxy.user: Type your proxy user name.
- hub.proxy.password: Type your proxy password.
- hub.proxy.nohost: Specify the domains to be excluded when connecting using the proxy.
- Save and close the application.properties file.
Mapping Fortify projects
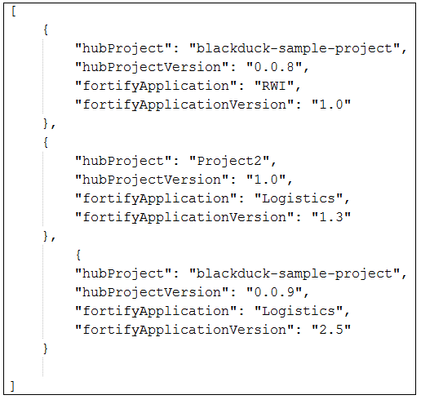
You can map specific Fortify applications to Black Duck by selecting which of your Black Duck projects to map to your Fortify applications. This is accomplished by editing the mapping.json file, located in the Config folder. You must specify the version numbers. Note that this file is case-sensitive.
1:1 Mapping: As of Black Duck versions 3.0.0 and higher, you can map one Black Duck project to one Fortify Application.
To map Fortify projects to Black Duck:
- Open the mapping.json file in a text editor. Edit the following lines:
- hubProject: Type the Black Duck project name.
- hubProjectVersion: Type the Black Duck project version.
- fortifyApplication: Type the Fortify application name.
- fortifyApplicationVersion: Type the Fortify application version.
- Save and close the mapping.json file.
You can map as many Fortify projects as needed. Repeat the preceding process for each mapped project. In the following example, three projects are mapped. Note that you must add a comma after the ending curly bracket for each project.
Additional mapping options
Black Duck Fortify versions 2.0.1 and higher provide the following mapping options:
- One to one: One Black Duck project version to one Fortify application version.
- One to many: One Black Duck project version to many Fortify application versions.
- Many to one: Many Black Duck project versions to one Fortify application version.
When mapping many Black Duck project versions to one Fortify application version mapping, the integration service removes the duplicate vulnerabilities across Black Duck project versions, and Fortify displays the Project Name as Multiple projects, and Project Version as Multiple versions for the vulnerability.
Adding the host as a trusted entity
To add the host as a trusted entity, you must execute the following command:
keytool -import -trustcacerts -keystore $JAVA_HOME/jre/lib/security/jssecacerts -file /path/to/certificate -alias hub
If you prefer your Fortify SSC plugin to trust self-signed certificates from Black Duck, then set the following value in the applications.properties file:
hub.always.trust.cert=true
Please be aware that trusting self-signed certificates is less secure than using a server certificate signed by a trusted authority; therefore, using self-signed certificates is not recommended.
Cron job settings
Optionally, you can configure Cron job settings, which are in the application.properties file. This enables your Fortify projects to be automatically updated with Black Duck information on a predetermined schedule. The default setting is once per hour. Black Duck recommends that you use http://www.cronmaker.com/ to create your Cron expression.
To configure Cron jobs:
- Open the application.properties file in a text editor. The application.properties file is in the Config folder.
- Edit the following settings:
- Cron.expressions= Paste in the Cron expression you created using http://www.cronmaker.com/.
- Save and close the application.properties file.
Job workflow
Batch jobs
Based on your Cron expression, the batch job performs the following steps:
- Deletes all .csv files created as part of the previous run.
- Parses the mapping.json file, and finds the Fortify application to which results are mapped. If the application is not present in Fortify SSC, it creates the application in Fortify SSC.
- Compares the BOM updated date with the previous job run time for each Black Duck project and version in mapping.json. If the BOM is updated after the previous job run, then it gets the security vulnerabilities corresponding to the Black Duck project name and version name.
- Transforms the security vulnerabilities object for output in csv format, and outputs a .csv file.
- Uploads the .csv file to Fortify by passing the Fortify application ID.
Batch job status
The batch job status file contains the date and time stamp of the last successful run.
Configuring batch jobs
You can change the batch job settings to force the Black Duck Fortify SSC plugin to push vulnerabilities from the specified date. By default, the Black Duck Fortify SSC plugin pushes the change vulnerabilities after the last successful run-time of the job. You can configure batch jobs by editing the batch job status file, located in the Config folder, as follows.
To configure batch jobs:
- Open the batch job status file in a text editor.
- Change the date to a date earlier than today. Be sure to use the existing date format shown in the file.
- Save and close the batch job status file.
Additional batch job setup considerations
The batch_job_status.txt file, located in the Config folder, is used to store the last successful run-time of the job. In the Deployment folder, the batch_job_status.txt file is blank. This allows all Black Duck projects to be pushed to Fortify on the first usage. During the initial run, if you have not added the project to the mapping.json file, then you cannot push the vulnerabilities.
Modify the batch_job_status.txt file to contain a date earlier than the last Bill of Materials update date for the Black Duck project. In the next run, the batch job pushes the vulnerabilities to Fortify.
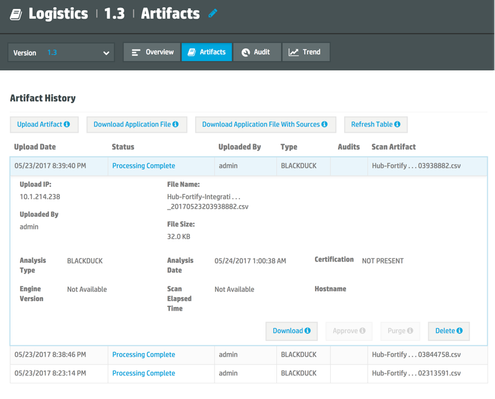
Manually uploading security vulnerabilities using the Fortify UI
You can manually upload security vulnerabilities to Fortify using the Fortify UI. You should familiarize yourself with the sample.csv security report file that is available in the Reports area in GitHub here.
Generally, to upload vulnerabilities, simply:
- Launch the Fortify UI.
- Go to the Upload page.
- Select Black Duck engine on the upload page.
- Upload the csv file using the Fortify UI.
If, for whatever reason, you are unable to select Black Duck engine on the upload page, follow these alternative instructions to ensure that the upload is properly read as Black Duck data:
- Create a scan.info file, and in this file, add engineType=BLACKDUCK.
- Create a Black Duck vulnerability report, which generates the security.csv file.
- Manually add the following columns in the security.csv file, consistent with the formatting of the provided sample.csv file:
- Project name
- Project version
- Rename the existing Project name column to Component name. This is because the old Project name column contains component name values.
- Black Duck Vulnerability URL
- Scan Date (yyyy-MM-dd HH:mm:ss.SSS)
Note: Add the following additional columns only if you're using the 2.0.2 parser and above. - Upgrade version
- Upgrade version released on
- Latest version
- Latest version released on
- Zip the scan.info and security.csv files.
- Upload the zip file using the Fortify UI.
Swapping projects
To swap projects, use the following process.
- Clean up all the uploaded files for the mapped Fortify application version.
- Update the last successful runtime of the job to the Bill of Material's updated date of the swapped Black Duck project in the batch_job_status.txt file.
- The swapped project vulnerabilities are pushed in the next batch run.
Using Black Duck Fortify SSC with Windows Task Scheduler
If you would like to launch the Black Duck Fortify plugin in Windows Task Scheduler, then there are a few additional configuration changes you must make. The changes are necessary because if you run the plugin from the Windows Task Scheduler, the plugin will be invoked from the system32 directory, and this invalidates certain relative paths. To address this, do the following:
- Set the
FORTIFY_APP_HOMEenvironment variable to your downloaded plugin location.
For example:FORTIFY_APP_HOME=C:\ssc\hub-fortify-ssc-integration-service-2.0.6 - Restart the system to ensure that the new environment variable is read
- Edit the batch file:
$FORTIFY_APP_HOME/bin/hub-fortify-ssc-integration-service.batIn that file, find the text:../config/
and replace it with:%APP_HOME%/config/ - Edit the config file:
$FORTIFY_APP_HOME/config/application.propertiesand replace ".." with${FORTIFY_APP_HOME}on the following lines:hub.fortify.batch.job.status.file.path=${FORTIFY_APP_HOME}/config/batch_job_status.txthub.fortify.report.dir=${FORTIFY_APP_HOME}/reporthub.fortify.mapping.file.path=${FORTIFY_APP_HOME}/config/mapping.jsonlogging.file=${FORTIFY_APP_HOME}/log/hub-fortify.logattribute.file=${FORTIFY_APP_HOME}/config/attributes.properties - Optional: Run the scheduler to verify all the configuration settings are correct.
Log files
The log files are in the Log folder. They contain the status of your Black Duck Fortify runs. The log file contains exception errors, file issues, and more. You must manually check the log file, as this is the only communications path monitoring and displaying the status of your Black Duck Fortify SSC service runs.
Black Duck Fortify SSC Release Notes
Version 2.0.10
New feature
- Added support for Fortify API authentication
Known issue
- Black Duck 2020.10.0 and later doesn't work with any of the released plugin versions. This will be resolved in the next release.
Version 2.0.9
Resolved issues
- Resolved the null pointer exception when the batch_job_status.txt file is empty.
Version 2.0.8
You must upgrade Black Duck Fortify parser to 2.0.2 or later.
Known issues
- While you create the last successful run-time for the job, note the time zone because some project versions are missed and are not pushed into Fortify SSC because of this issue.
Version 2.0.7
New features
- Added vulnerability recommendation field to recommend remediation action.
- Added property so that vulnerability updates are pushed when the count is zero and Fortify SSC is in sync with Black Duck. The hub.fortify.push.for.zero.vulnerability=true property was added.
- You must upgrade Black Duck Fortify parser to 2.0.2.
Version 2.0.6
New features
- Contains new Google-Analytics based phone home functionality to assist in support and future product planning. To opt-out of sending analytics data, set phone.home.enabled=false in the applications.properties file, and restart the hub-fortify-integration script.
- The fortifyApplication and fortifyApplicationVersion fields can now accept a pipe symbol ( | ).
- Supports self-signed Black Duck certificates (see documentation, above).
- Supports Black Duck API token authentication (see documentation, above).
Version 2.0.5
New features
- Version 2.0.5 adds support for Black Duck Hub versions 4.5.0 and higher. You must use Black Duck Fortify SSC versions 2.0.5 or higher with Hub versions 4.5.0 and higher.
Known issues
- For the most accurate vulnerability reporting from the Black Duck Fortify SSC Integration, use Hub versions 4.6.0 or higher to get the fix for the vulnerable BOM component's inconsistent behavior in paging API.
- The Fortify SSC plugin is not compatible with Hub versions 4.7.x. Please upgrade your 4.7.x Hub to Black Duck version 4.8.0 or higher to use the Fortify SSC plugin. Or contact your authorized Black Duck support representative.
Version 2.0.4
New features
- Version 2.0.4 now supports Black Duck Security Associations (BDSA). BDSA provides additional vulnerability detail, and is released as part of the Black Duck Hub version 4.4.0. Refer to the Black Duck Hub version 4.4.0 documentation for additional information.
- The Spring Security component is updated for improved security.
Known issues
- Due to a known issue in Black Duck Hub version 4.4.0, the Black Duck Fortify plugin does not function properly when used in conjunction with Black Duck Hub version 4.4.0. The solution is to upgrade to versions 4.4.1 or higher of Black Duck Hub.
- In all versions of the Black Duck Fortify SSC plugin, up to and including version 2.0.4: if you use a basic proxy and enter incorrect proxy credentials, the Fortify SSC plugin hangs. The workaround is:
- Control-C out of the plugin.
- Provide proper credentials.
- Restart the Hub Fortify plugin.
Version 2.0.3
New features
- The Black Duck Fortify SSC Plugin now supports version 17.20 of Micro Focus Fortify SSC. To use SSC version 17.20, you must use the Hub Fortify SSC version 2.0.3 plugin, along with the Black Duck Fortify SSC Parser, versions 2.0.1 or higher. For more information, refer to the Parser topic in this documentation.
Resolved issues
- Resolved an issue wherein uploads with zero vulnerabilities that followed the first upload were not reflected in the Fortify user interface.
Version 2.0.2b
Changes in 2.0.2b
- You can now connect to the Hub through a proxy connection, even when proxy credentials (username and password) are not required.
- Resolved an issue wherein when connecting to the Hub, the warning message displayed: [OkHttp ConnectionPool] okhttp3.OkHttpClient:126 log - A connection to "Hub Server Url" was leaked. Did you forget to close a response body?
Version 2.0.2
New features
- Hub Fortify SSC version 2.0.2 supports the creation of Fortify applications with custom attributes.
- You are no longer required to manually clean up the batch_job_status.txt file when executing the batch application in a non-production environment.
Known issues in version 2.0.2
- In multi-threaded environments, sometimes the Hub APIs return errors with a response code of 400 or 401. As a workaround for this scenario, open the application.properties file, and change the maximum.thread.size value to 1. Then execute the batch job. The following are examples of error messages where this workaround is required.
java.util.concurrent.ExecutionException: com.blackducksoftware.integration.hub.rest.exception.IntegrationRestException:
There was a problem trying to GET this item: https://<<HUB_HOST_NAME>>/api/projects?q=name%3A<<HUB_PROJECT_NAME>>&offset=0&limit=100. Error: 401
java.util.concurrent.ExecutionException: com.blackducksoftware.integration.hub.rest.exception.IntegrationRestException:
There was a problem trying to GET this item: https://<<HUB_HOST_NAME>>/api/projects?q=name%3A<<HUB_PROJECT_NAME>>&offset=0&limit=100. Error: 400
Version 2.0.1
New features
- Hub Fortify SSC version 2.0.1 now includes addition mapping options.
Version 2.0.0
New features
- Hub Fortify SSC version 2.0.0 now programmatically pushes open source vulnerability data from Black Duck Hub into Fortify SSC.
- You can now view vulnerability information at the project/version and component version level.
- You can now view Hub vulnerability guidance within Fortify SSC.
Version 1.0.0
Known issues for version 1.0.0
- Vulnerability report
In the existing Hub Fortify integration, you must manually upload the vulnerability report in the Fortify UI. Each row in the vulnerability report must have a unique key. In the Black Duck parser plugin, the ID is a unique key, which is called as Issue Id in Fortify SSC.
Workaround
Black Duck has modified the combination of this unique key to adapt to additional situations as follows.
- Download the previous report for the application to any folder.
- Delete all files uploaded for the project.
- Place the new Black Duck parser plugin into Fortify.
- Upload the previous report which is saved as part of Step 1, so that the issue ID is updated into the Fortify databases.
©2020 Synopsys, Inc. All Rights Reserved