Table of contents
| Table of Contents | ||||||||
|---|---|---|---|---|---|---|---|---|
|
A distribution job is a set of instructions for using specific channels to send certain alerts to Black Duck users. This section explains how you configure and manage these jobs.
About Distribution Jobs
You use the Black Duck providers and channels that you configure to create distribution jobs in Alert.
...
| Info |
|---|
When configuring distribution jobs, required fields are denoted by a red asterisk (* ). |
...
| Info |
|---|
The notification types shown are for the selected provider in the distribution job. Therefore, only Black Duck notification types are available to select if you select the Black Duck provider. |
...
| Info |
|---|
In Alert versions, 5.1.0 and later, the Black Duck project and project version notification types are supported. |
Creating a distribution job
Use the following process to create a distribution job. Required fields are denoted by a red asterisk ( * ).
Navigate to Jobs > Distribution, click +New. The New Distribution Job dialog displays.
To enable the distribution job, leave the Enabled checkbox selected or deselect the checkbox to disable the job.
Using the Channel Type dropdown menu, select the job type; either Azure Boards, Email, Jira Cloud, Jira Server, MS Teams, or Slack.
Notifications generated through Alert are sent using this channel. The New Distribution Job dialog expands to display the appropriate fields for the selected job type.
Note: The distribution jobs display an error message when there are validation errors relating to global configurations.Complete the fields as follows.
The following are common for all job types:
Name: Enter a unique name for the distribution job.
Frequency: Use the dropdown to select how frequently you want Alert to check for notifications to send: Real-Time as triggers occur or Daily.
Provider Type: Select Black Duck. This displays additional fields, which are described in the following steps.Provider Configuration: Enter the unique name assigned to this provider configuration, which is configured on the Providers page.
After completing the previous fields, additional fields display which are pertinent to your selected provider type:
Notification Types: Select one or more types from the dropdown list. Only the selected notification types are included for this distribution job. Your selections display in the Notification Types box.
- Click X at the right of a notification type to remove it from your selections.
- Alert versions 5.0.0 and later support the BOM_EDIT notification.
- In Distribution Job configurations with Black Duck selected as the provider, BOM_EDIT displays as an option in the dropdown selector for Notification Types. The BOM_EDIT notification is primarily used in Jira Cloud, Jira Server, Azure Boards to keep component information on issues as up-to-date as possible.
- In Alert versions 5.1.0 and later, two new Black Duck notification types are supported: Project and Project Version. When selected, you are notified when new projects or project versions are created or deleted.
- When used with Jira Cloud, Jira Server, or Azure Boards, the deletion of either project or project version triggers a Resolve Transition, when enabled, for all issues related to it.
For information about notifications in Black Duck, refer to your Black Duck help pages:
https://<hub-server>/doc/Welcome.htm#users_and_groups/managing_notifications.htm?Highlight=notification
Notification types are as follows:
- BOM_EDIT- changes to a BOM component such as updating its license or usage
- PROJECT - projects are created or deleted
- PROJECT VERSION - project versions are created or deleted
- LICENSE_LIMIT - license restrictions are near or exceeding capacity
- POLICY_OVERRIDE - policy is overridden
- RULE_VIOLATION - policy violation
- RULE_VIOLATION_CLEARED - policy violation is cleared (either the affected BOM component was deleted or the policy itself was updated)
- VULNERABILITY - vulnerabilities introduced, updated, or removed.
- COMPONENT_UNKNOWN_VERSION - a component is added to the BOM that does not have a version.
Processing: Select one of the following for how the notification message is processed:
- Default: Displays the notifications as they are.
- Digest: Displays a more streamlined version.
- Summary: Only includes changes that have occurred.
Note:
In version 5.3.0 and earlier, the Processing field is labeled as Format.
Important note:
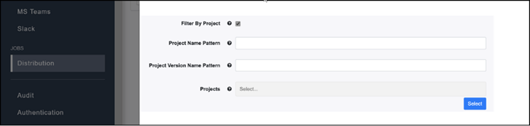
The Summary processing type was removed (Alert 6.2.0) as an option for the issue tracker channels such as Jira Cloud, Jira Server, or Azure Boards because of unexpected behavior with the created issues.Filter by Project: If selected, only notifications from the selected projects table are processed. Otherwise, notifications from all projects are processed. Selecting this checkbox displays these additional fields:

Note: Alert (ProviderDataAccessor) now retrieves Black Duck project and user data information directly from Black Duck rather than using the database tables in Alert.
...
Additional Email Addresses Only: Selecting this checkbox tells the distribution job to send emails to the additional email addresses only.
Attachment File Type: You can provide an external file type to be used as an email attachment in the Distribution job.
Click the dropdown menu for Attachment File Type, and select a file type. Attachment options are CSV, JSON, XML, and NONE which is the default.
If a file type is selected, then a file of that type that shows the message content is attached to the email.
Email considerations
For email, one message is sent per project, rather than per project version. This occurs only if the notifications are processed in the same batch.
...
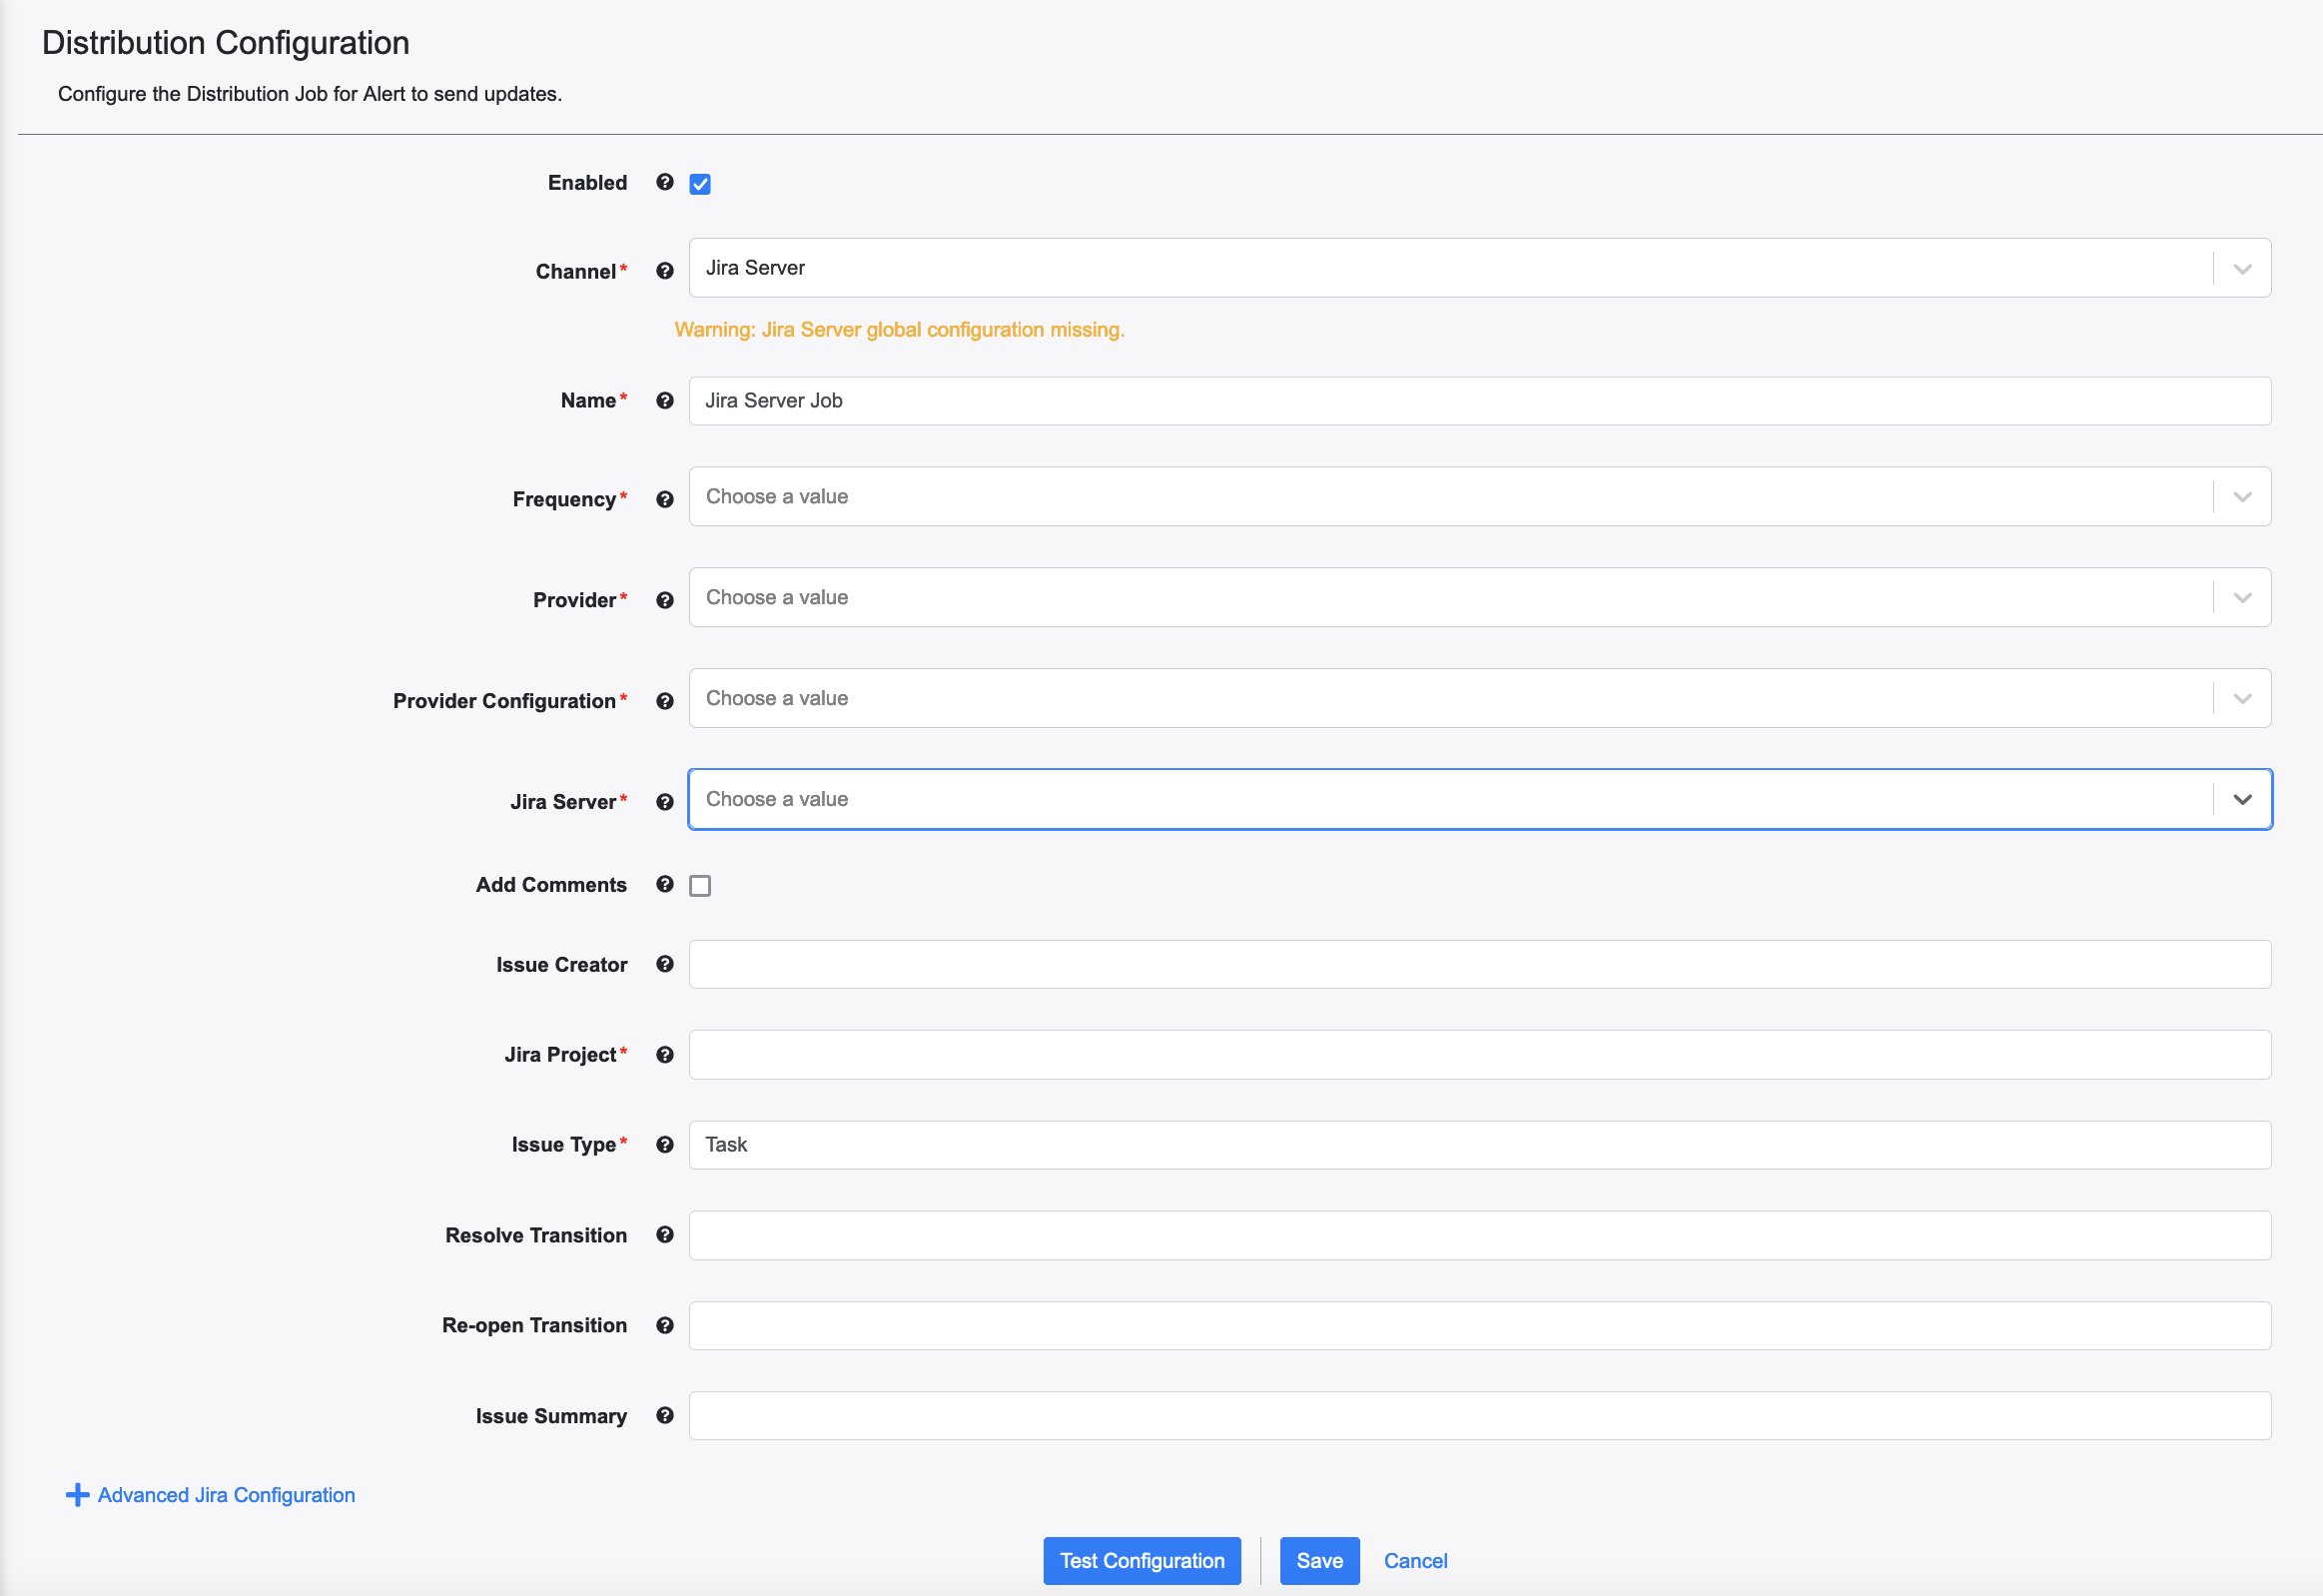
In Alert versions 5.2.0 and later, you can configure distribution jobs to send notifications to the Jira server channel. Such notifications create new tickets, or update tickets matching the notification content. The ticket data displays in a format similar to an email or Slack message containing a single piece of data.
...
In Alert versions 6.10.0 and later, you must select the Jira server configuration name that is assigned, which is configured on the Jira Server channel configuration.
Jira Server: Select a Jira server that will be used to create or update issues. Please note the options are limited to the first 25 Jira Servers.
Add Comments: If this checkbox is selected, comments are added to the Jira ticket with the latest changes.
Issue Creator: The user name of the Jira server user to assign to the Issue Creator field in the Jira issue.
Jira Project: The name of the Jira project for which this job creates/updates Jira tickets.
Issue Type: Specify the issue type; for example, bug or task.
Resolve Transition: If a transition is listed (case sensitive), it is used when resolving an issue. This happens when Alert receives a DELETE operation from a provider.
This must be in the Done status category.Re-open Transition: Used for re-opening issues. If a transition is listed (case sensitive), it is used when you reopen an issue. This happens when Alert receives an ADD/UPDATE operation from a provider.
This must be in the To Do status category.Issue Summary: Summary of the issue that Alert creates. The following variables can be used to enter content from the message
providerName,projectName,projectVersion,componentName,componentVersion, andseverity.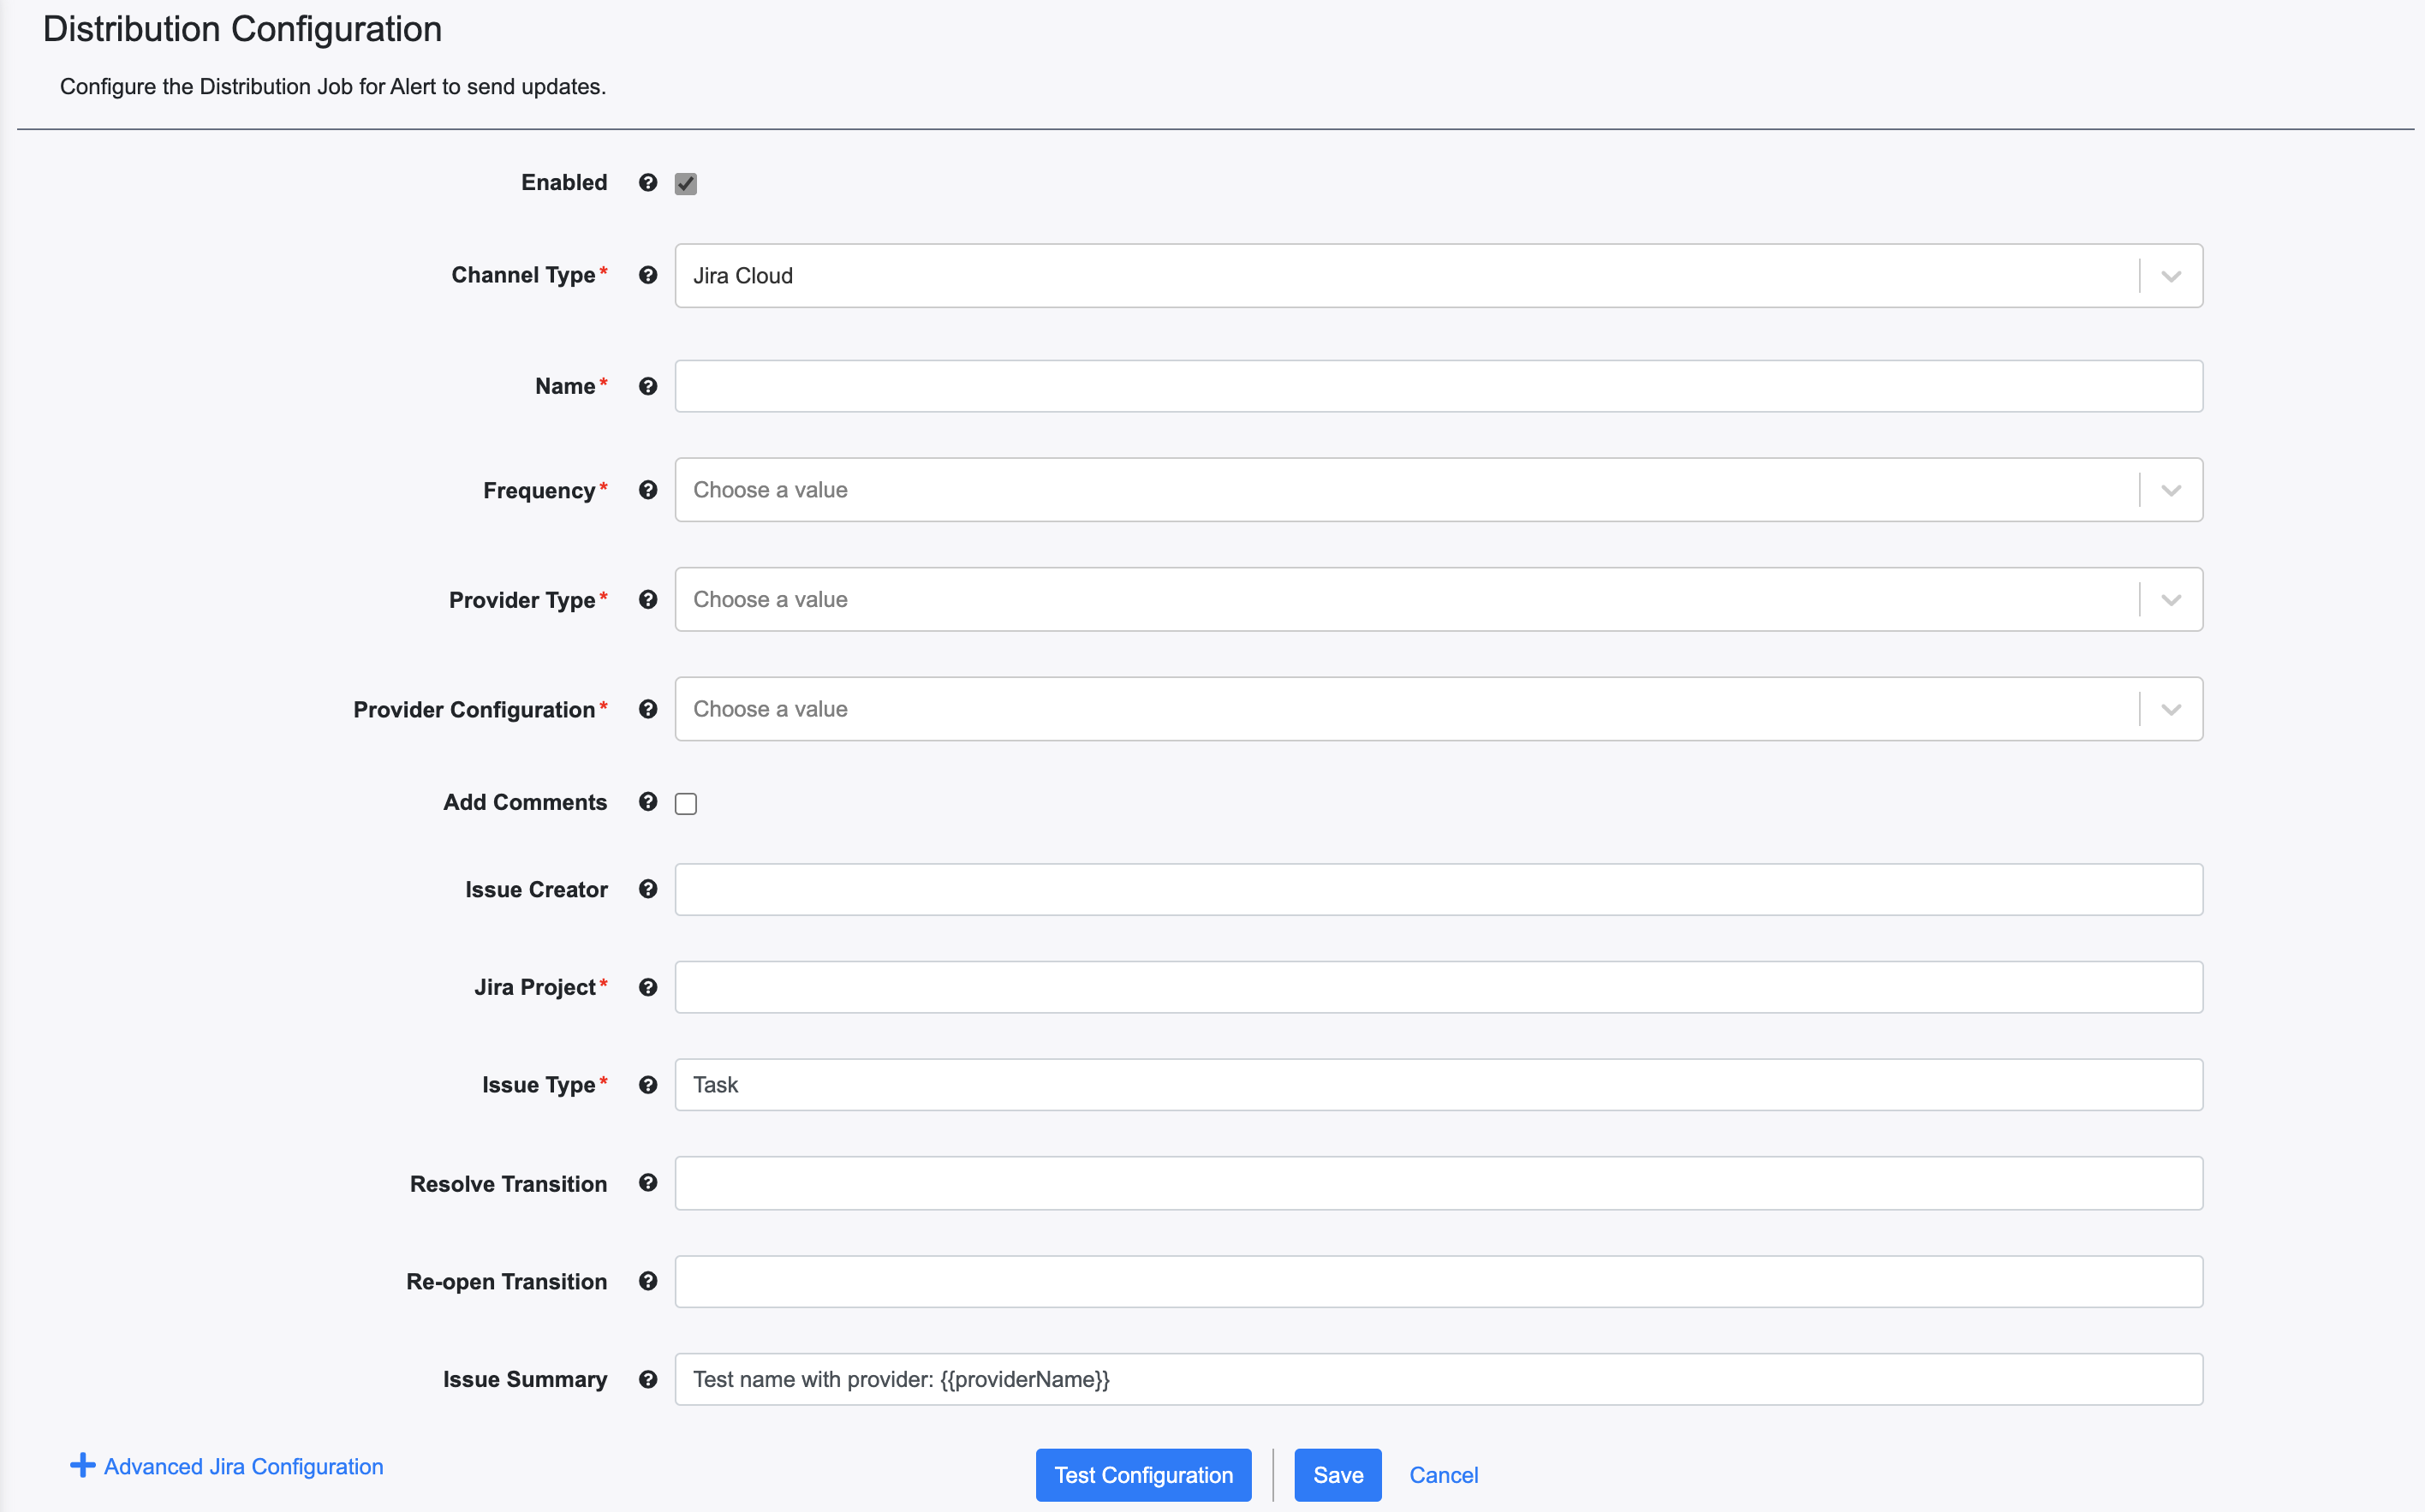
+ Advanced Jira Configuration
Configure custom fields for Jira Server and Jira Cloud distribution jobs. In the Advanced Jira Configuration section, expand this panel to open a field mapping dialog box. Use this field to provide static values to Jira fields or map them to information from the notifications.
| Info |
|---|
Alert only populates the custom fields when creating the ticket initially. When the Distribution Job changes to add more custom fields or change any of the values, these changes are not pushed to existing tickets. |
To add a custom Jira Field.
Click + Advanced Jira Configuration
Click + New to create a new mapping
Enter a name for the Jira Field
Supported field types are:String - i.e. text fields: single and multi-line)
Array - A space-separated list of values with the following supported item types:
o String (for example, labels)
o Component (for example, Component/s field)
o Option (for example, Checkboxes)
Option (for example, single-select field)
Priority – for example, high.
User - Use username on Jira Server and Jira Data Center. Use account_id on Jira Cloud. (Find an account ID for a Jira Cloud user.)
Enter a static value or select one of the following placeholders.
{{
providerType}} - The name of the Alert provider (Black Duck) from which the notification was received.{{
projectName}} - The name of the project in Black Duck{{
projectVersion}} - The version of the project in Black Duck{{
componentName}} - The name of the component from the project-version in Black Duck{{severity}} - The policy severity or the highest vulnerability severity for the component in Black Duck.{{componentVersion}} - The version of the component from the project-version in Black Duck
"{{policyCategory}}" - The policy category field for a policy violation in Black Duck"{{shortTermUpgradeGuidance}}" - The short term upgrade recommendation for security vulnerabilities of a component in Black Duck"{{longTermUpgradeGuidance}}" - The long term upgrade recommendation for security vulnerabilities of a component in Black Duck"{{componentUsage}}" - The usage option of the component in Black Duck"{{componentLicense}}" - The license name of the component in Black Duck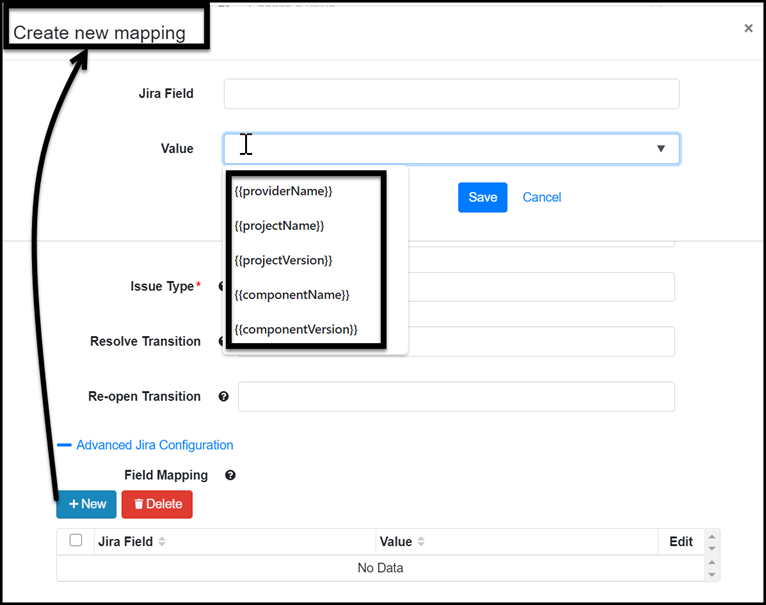
Templates can be used along with placeholder values to create custom field values.
For example, using the following template:
Code Block "Project Name: {{projectName}} | Project Version Name: {{projectVersion}}"Would produce the following value in the Jira Custom field:
Code Block "Project Name: my_project | Project Version Name: my_version"
...
+ Advanced Jira Configuration
Configure custom fields for Jira Server and Jira Cloud distribution jobs. In the advanced Jira Configuration section, expand this panel to open a field mapping dialog box. Use this field to provide static values to Jira fields or map them to information from the notifications.
| Info |
|---|
Alert only populates the custom fields when creating the ticket initially. When the Distribution Job changes to add more custom fields or change any of the values, these changes are not pushed to existing tickets. |
To add a custom Jira Field.
Click + Advanced Jira Configuration
Click + New to create a new mapping
Enter a name for the Jira Field
Supported field types are:String - i.e. text fields: single and multi-line)
Array - A space-separated list of values with the following supported item types:
o String (for example, labels)
o Component (for example, Component/s field)
o Option (for example, Checkboxes)
Option (for example, single-select field)
Priority – for example, high.
User - Use username on Jira Server and Jira Data Center. Use acc nt_id on Jira Cloud. (Find an account ID for a Jira Cloud user.)
Enter a static value or select one of the following placeholders.
{{
providerType}} - The name of the Alert provider (Black Duck) from which the notification was received.{{
projectName}} - The name of the project in Black Duck{{
projectVersion}} - The version of the project in Black Duck{{
componentName}} - The name of the component from the project-version in Black Duck{{
componentVersion}} - The version of the component from the project-version in Black Duck{{severity}} - The policy severity or the highest vulnerability severity for the component in Black Duck"{{policyCategory}}" - The policy category field for a policy violation in Black Duck"{{shortTermUpgradeGuidance}}" - The short term upgrade recommendation for security vulnerabilities of a component in Black Duck"{{longTermUpgradeGuidance}}" - The long term upgrade recommendation for security vulnerabilities of a component in Black Duck"{{componentUsage}}" - The usage option of the component in Black Duck"{{componentLicense}}" - The license name of the component in Black Duck
Templates can be used along with placeholder values to create custom field values.
For example, using the following template:
Code Block "Project Name: {{projectName}} | Project Version Name: {{projectVersion}}"Would produce the following value in the Jira Custom field:
Code Block "Project Name: my_project | Project Version Name: my_version"
...
If information is missing, the notification Required field missing displays in red above the affected field. Complete the required fields, and click Test Configuration. When the test is successful, click Save.
Example of a Jira Cloud distribution setup
The following is an example of a possible Jira Cloud job distribution setup.
...
For more information regarding permissions, refer to Atlassian: Managing Project Permissions.
Copying a distribution job
In Alert versions 5.0.0 and later, the Distribution table includes an additional column containing a copy button, located at the far right of each distribution job. This enables you to copy the configuration of an existing distribution job and configure new jobs quickly where only a small number of fields differ between jobs.
...
When resending a notification to a Jira Cloud distribution job from the Audit page, if that distribution job includes transitions and has already succeeded, then an attempt to resend a message to it fails because Jira Cloud has already executed the transition for that message.
Editing a distribution job
In Jobs > Distribution, click the Edit (pencil) icon at the right of the desired job. The Edit Distribution Job dialog displays. In Alert version 5.1.0 and later, double-clicking a row in the Distribution table opens the Edit Distribution Job dialog for the selected entry.
Make the desired edits.
Click Test Configuration to send a test alert to ensure values are valid.
Click Save to save the edited job. Your changes are saved, and you are returned to the Distribution screen.
Deleting a distribution job
In Jobs > Distribution, click the row of the desired job to select it.
Click Delete. A popup asks you to confirm the deletion.
Click Confirm. The job is deleted.